File Uploading Process Developer
Overview:
File Uploading Process Developer is the
basic step of uploading delimited files using File Uploading Process. Through
this tool we have to define the process for file uploading and distributing /
inserting the data in required tables in runtime. This tool helps us to exclude
coding for every new scenarios of file uploading in database.
What is Process?
In this tool, Process is defined as the basic program
based on file uploading scenarios which helps to generate a quick code for any
new scenarios. This code is totally symbolic AI and work on how user defined it
in File Uploading Process Developer.
A process can
be defined for single delimited data file to distribute data to multiple tables
also we can call procedure to execute in between loading the data.

Functional Flow:
File
Uploading Process Developer is divided in 3 sections.
·
Process Definition
·
Process Objects
· Objects Fields / Arguments
Process Definition:

In first column
“Process#” will automatically
generated once user saved the changes on screen and this number is the primary
key to identify every Process. Second column “Process” is used to define the process name and this name is also
uniquely identified. The third column “Extension”
is a selectable list field from which user need to select extension ‘.csv’ or ‘.txt’ of uploading file, ‘.csv’ will appear as default value.
Next “Split By” fourth column is
another a selectable list field from which user need to select data splitter
symbol ‘, / ~ / ^ / @ / $ /
#’, ‘Comma “,”’ will appear as default value If ‘.csv’ is selected in “Extension”
list then “Split By“ is
automatically set to ‘Comma “,”’. Field
“App” is also a selectable list
field from which user need to select application for which user creating this
process. A check option “Escape Top”
is use to ignore headings in loading file. Note: If user un-check option “Escape Top”, then headings for all
column must exclude from file before uploading it. “Download Sample File” button is used to download sample file for
uploading designed through File
Uploading Process Developer. “Active”
check use to validate the process. “Modified
On” & “Modified By” will
automatically updated on saved changes.
In case of
updating existing process make sure that there is no file uploaded on process
if file is uploaded on selected process table following error alert will be
raised to halt the changes.

Process Objects:

First check “Active” is used to validate define
object in the process. “Seq.” column
is used to define the sequence by which objects will call in runtime. On third,
“Type” is a selectable list field from which user need to select the type of
the object which can be ‘Table’ or ‘Procedure’. The fourth column “Objects” is the main column for this section and it can be edit
using “List” button next to it. By
pressing “List” button a list is
populated with all accessible tables if ‘Table’
is selected in “Type” field and if ‘Procedure’ is selected then all
accessible procedures are populated in the list. To generate auto sequence
click on “Re-Sequence” button.
Also, before
selecting your table, you can add ‘(FILENAME
VARCHAR2(100), RECNUM NUMBER)’ column in source table to record loading
file name and row number. If not, system will guide you to add both columns by
clicking the “Add Columns” (Only if required table is in schema) as mentioned
below in snapshot. If user still facing issues in adding the columns, ask DBA
to add both column in your required table.

If required
table is in another schema an error will be. Therefore, DBA can only add both
the column.

Note: Both
columns ‘(FILENAME VARCHAR2(100), RECNUM
NUMBER) are not mandatory columns.
Objects Fields / Arguments:

After defining
the process definition and process objects basics the second part is Objects Fields / Arguments.
Objects Fields / Arguments columns are
automatically populated once the “Object”
column is updated in “Process Objects”
section. If user wants to delete a record from Process Fielding section then right click on the record and select
the option delete record.
Is Active:
It is used to validate define field in
the process.
Seq. no.:
In this column
a unique sequence must be define to list all column in order. Data will be
inserted in these column as per sequence when the file is uploading using File Uploading Portal. To generate auto
sequence click on “Re-Sequence”
button.
Field:
In Field, all the column or arguments are
defined with their name mentioned in table or procedure and can be only be
select using list of values LOV by double clicking on the Field column. If selected Field
was already mentioned in the grid then an error raised to notify the user. It
is highly recommended to define distinct Field
and their Seq. These selected fields
or arguments are used in insertion in the table or calling procedure on
runtime.
Description:
This column
used for proper description of selected column of a table and also used in
sample uploading file as headings of the columns. If user did not mention any
description then system will automatically updated it with column or argument
name mentioned in selected table or procedure.
Data Form:
The list Data Form contains 10 following options
and all option has their own functionality which is used during the File Uploading Portal.
·
Map From
File:
In
order to upload data defined in loading file user has to select Map From File option.
·
Query
Data:
When
Query Data option is selected it
means a query required to generate data on runtime. Before mentioning the query
it is highly recommended to check the query on SQL in order to avoid any errors
during file loading. Also, make sure that there is only one column mentioned in
the query in order to return single value during insertion in order to prevent
any exception.
·
Reference:
Option
Reference is used when a query is
used to retrieve a data from database using the value mentioned in loading
file. For e.g. Value mentioned in loading file is “FINANCE” which is department
name column (DNAME) found in DEPT table in scott schema and a data retrieval query
defined in process i.e. “Select Deptno
from departments where dname = :value” on runtime value “FINANCE” picked
from loading file and replace it with “:value” variable in order to get the
department number on behalf of its name. Note: Always use ‘:VALUE’ as variable for runtime execution.
·
Default:
Default option is used to define a
hardcoded value in PLSQL section for inserting it in table while File Uploading Portal.
·
Log#:
Log# option is used to insert a unique
login number of a session allocated to login user.
·
User ID:
User ID option is used to insert login
user ID.
·
Parameter
Date:
Parameter Date is used to insert specific
date in a column while uploading file and it is available on File Uploading Portal.
·
File Name:
File Name is used to insert uploading
filename in a column while uploading file.
·
Record#:
Record# is used to insert row number of
rows in uploading file.
·
Parameter
ID:
Parameter ID is used to insert input
value in a column while uploading file and it is available on File Uploading Portal.
Min. Value:
Min. Value option helps to restrict the
data before insertion and validate with it. (Usable for number and date
columns).
Max. Value:
Max. Value option helps to restrict the
data before insertion and validate with it. (Usable for number and date
columns).
Min. Length:
Min. Length option helps to check the
length of data and apply validation as per defined value. Note: Do not use this
option for Date columns.
Max. Length:
Max. Length option helps to check the
length of data and apply validation as per defined value. Note: Do not use this
option for Date columns.
Essential Check:
This check
marks the field as mandatory item and restrict it as not null value field.
Check-In Check:
Check-In Check is used when the
validation required on the data mentioned in loading file between some specific
values. The Check-In values are
define in PLSQL field and the format to define values is to separating each
value using "|" e.g. VAL1|VAL2|VAL3|VAL(n)...”. Also, if Check-In check is active then the field Data
Form must be set to Map From File and
Check Query check option must
be in-active.
Check Query Check:
Check Query Check is used when the
validation required on the data mentioned in loading file using a query. The
query is define in PLSQL field using where clause to validate the value given
in loading file. Also, if Check Query is
active then the field Data Form must
be set to Map From File and Check-In option must be in-active. For
e.g. in MGR column employee ids will be check from employee no columns i.e. “select 1 from emp where empno = :VALUE”.
Note: Always use ‘:VALUE’ as variable for runtime execution.
Is Where:
The check is
active and de-active when the system detects a where clause in query mentioned
in PLSQL.
PLSQL:
This column is
used to define Values as per user requirements.
“Modified On” & “Modified By” will automatically
updated on saved changes.
File Uploading Portal
Overview:
File Uploading Portal is designed to
upload delimited data files in oracle database using oracle forms. It is a hassle free tool and work on defined File Uploading Process accordingly. It
has both option for server users and for client users which can help to upload
and download as per user requirement.

Functional Flow:

Flow is
defined in 2 types Server Activity
and Client Activity. There is only
one difference in Server Activity and Client Activity and that is the
calling of loading file. If user wants to upload data by calling it from server
directory then user must make sure that the uploading data file is placed on
server’s directory i.e. “C:\zDir\Data.csv”.

Or user can select Client Activity to upload file from user PC’s desktop.
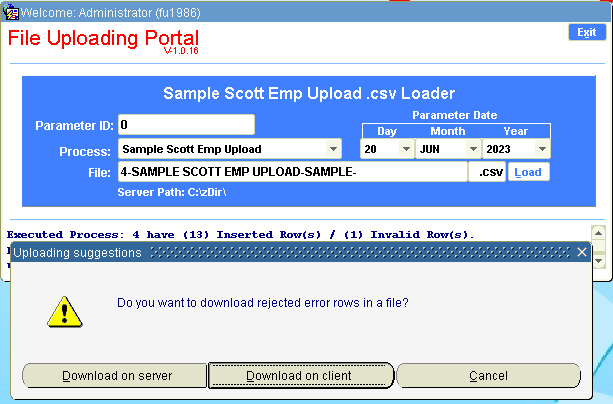
Now go to File Uploading Portal, define parameter
ID (if required), select parameter date (if required), select process from list
and click on load.

Before
starting client activity make sure that your uploading data file is placed on
client drive and can easily be accessible. A dialog open to select data file
saved on client machine. As for quick response and smart performance try to
upload small sized (KBs) files. If data file contain large amount of data which
exceed the file size in (MBs) then spilt the file into multiple pieces. It is
highly recommended to upload minimum sized file. After selection of file click
on open to execute the load process. Once process is executed system will
notify further steps via alerts.

Once raw data uploaded system will call defined process to generate code load complete data in source tables defined in File Uploading Process.
After
completion of file uploading, system will notify the status of uploaded rows
and rejected rows as picturized in below snapshot

If there are
any rejected rows while uploading the file, system will provide downloading
option for rejected rows. User perform similar actions to download as perform
in for Server Activity and Client Activity for uploading the file.

User can select the download location as per requirement.

Sample Rejected Rows File:

File Uploading
Portal Application is developed using Oracle Forms 10g and can be upgrade.
1 comment:
Can you pls provide the source for forms12c
Post a Comment